An elective offered at CU Boulder is Mechatronics II, which builds on the introductory Mechatronics course. This course covers advanced topics, including computer vision, machine learning, feedback control, and advanced circuit design. Unlike the previous course, Mechatronics II emphasizes the use of a Raspberry Pi 5 instead of an Arduino.
For a semester-long group project with a class-driven theme, we organized a class competition. Our goal was to design an autonomous pet robot capable of responding to verbal and physical commands, similar to a real pet. The competition was set up as a pet show, where we would demonstrate each robot’s abilities in categories like tricks, autonomy, and design aesthetics.
The final design report can be downloaded below, and my contributions are documented throughout this page.
Meet the WALL-E Inspired Pet
Instead of creating a typical robotic dog or cat, Team Reamobile chose to recreate the iconic character WALL-E for this project. We aimed to replicate his movie design while also incorporating our own creative touches.
Project Requirements
The Excellent Autonomous Pet (EAP) project had the following key requirements:
Budget: Shall not exceed a supplemental cost of $250.
User Interface: Must include a user interface.
Autonomous Mobility: Must implement autonomous mobility.
Environmental Interaction: Must be able to interact with the environment.
The team achieved this with the following key features:
Computer Vision
4 DOF Robotic Arm
Voice command recognition
Facial expression
Wall-E’s notable stomach compartment
Autonomous travel with object avoidance
WALL-E Design
The Wall-E-based design can be broken up into 4 major categories:
Drive System
Internal Compartment
Head and Expressions
Robotic Arm
Drive System
WALL-E uses treads purchased from Amazon and incorporates two servo motors.
The movement system is controlled by a motor driver that enables forward, backward, left, and right movements, along with collision avoidance using a RealSense camera. A Python class was developed to initialize the motors and provide user-friendly commands, simplifying movement control:
forward (speed)
backward (speed)
cw(speed) (clockwise)
ccw(speed) (counterclockwise)
drive(speed, turn) (for combined turning and motion)
The 'drive' command supports object tracking and is designed for future development, using separate PID loops for coordinated turning and movement based on RealSense input.
Internal Compartment
One of WALL-E's key features is his functional stomach compartment, designed to store items and compact trash, similar to the movie. I built a compartment using 1/8" thick acrylic with right-angle brackets, forming WALL-E’s body and connecting it to the drive system.
The door mechanism uses limit switches, hinges, a geared DC motor, string, and a spool to open and close. It lowers until an outer switch is triggered, then rewinds until an inner switch stops the motor. The tilt plate raises by 5 degrees using a servo motor, allowing items to roll out.
Controlled by a Raspberry Pi 4 via PCB, the DC motor connects to a SparkFun Motor Driver and is powered by an 11.1V LiPo battery, while the tilt plate servo receives commands from the Adafruit Servoboard.
Head and Expressions
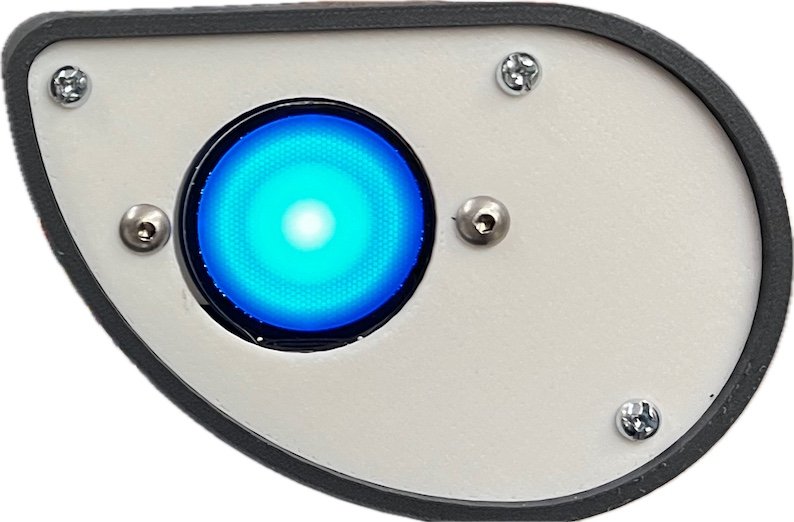
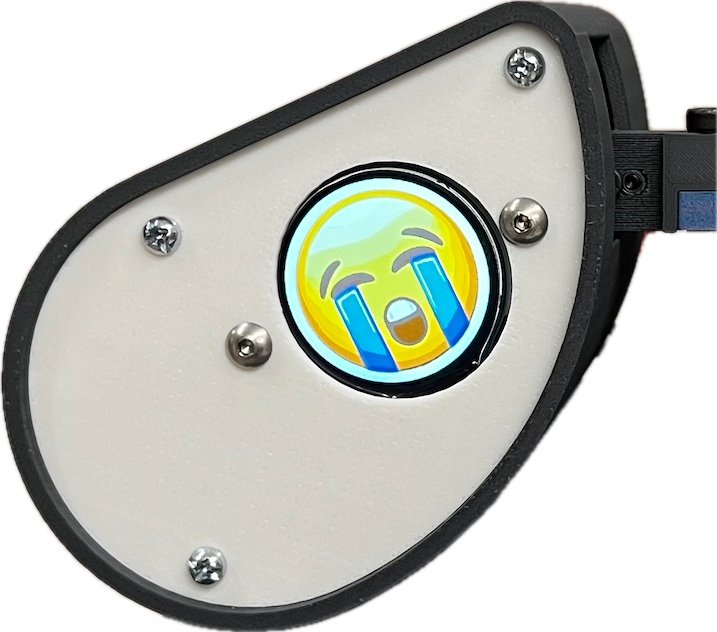
To make WALL-E more life-like, I designed a visual system resembling Wall-E’s eyes, adding both functionality and aesthetic appeal. Two LCDs display static images based on audio cues from a microphone camera, enabling interaction with the environment. The default image shows blue robot eyes inspired by Wheatley from Portal, while red eyes indicate anger, question marks show confusion, and a crying emoji signifies sadness.
The LCDs are mounted to a 3D-printed eye panel using adapters that hold the rods on the back of the screens. To further enhance emotion, the eye sockets use 20 kg servo motors to adjust angles, providing dynamic expressions rather than static ones.
To support the eye assembly, I created a custom 3D-printed neck inspired by robotic arms, featuring fixed joints for stability. Personalized details include 'sko buffs' and 'Wall-E' inscriptions on the neck to connect the design to the university community.
Robotic Arm
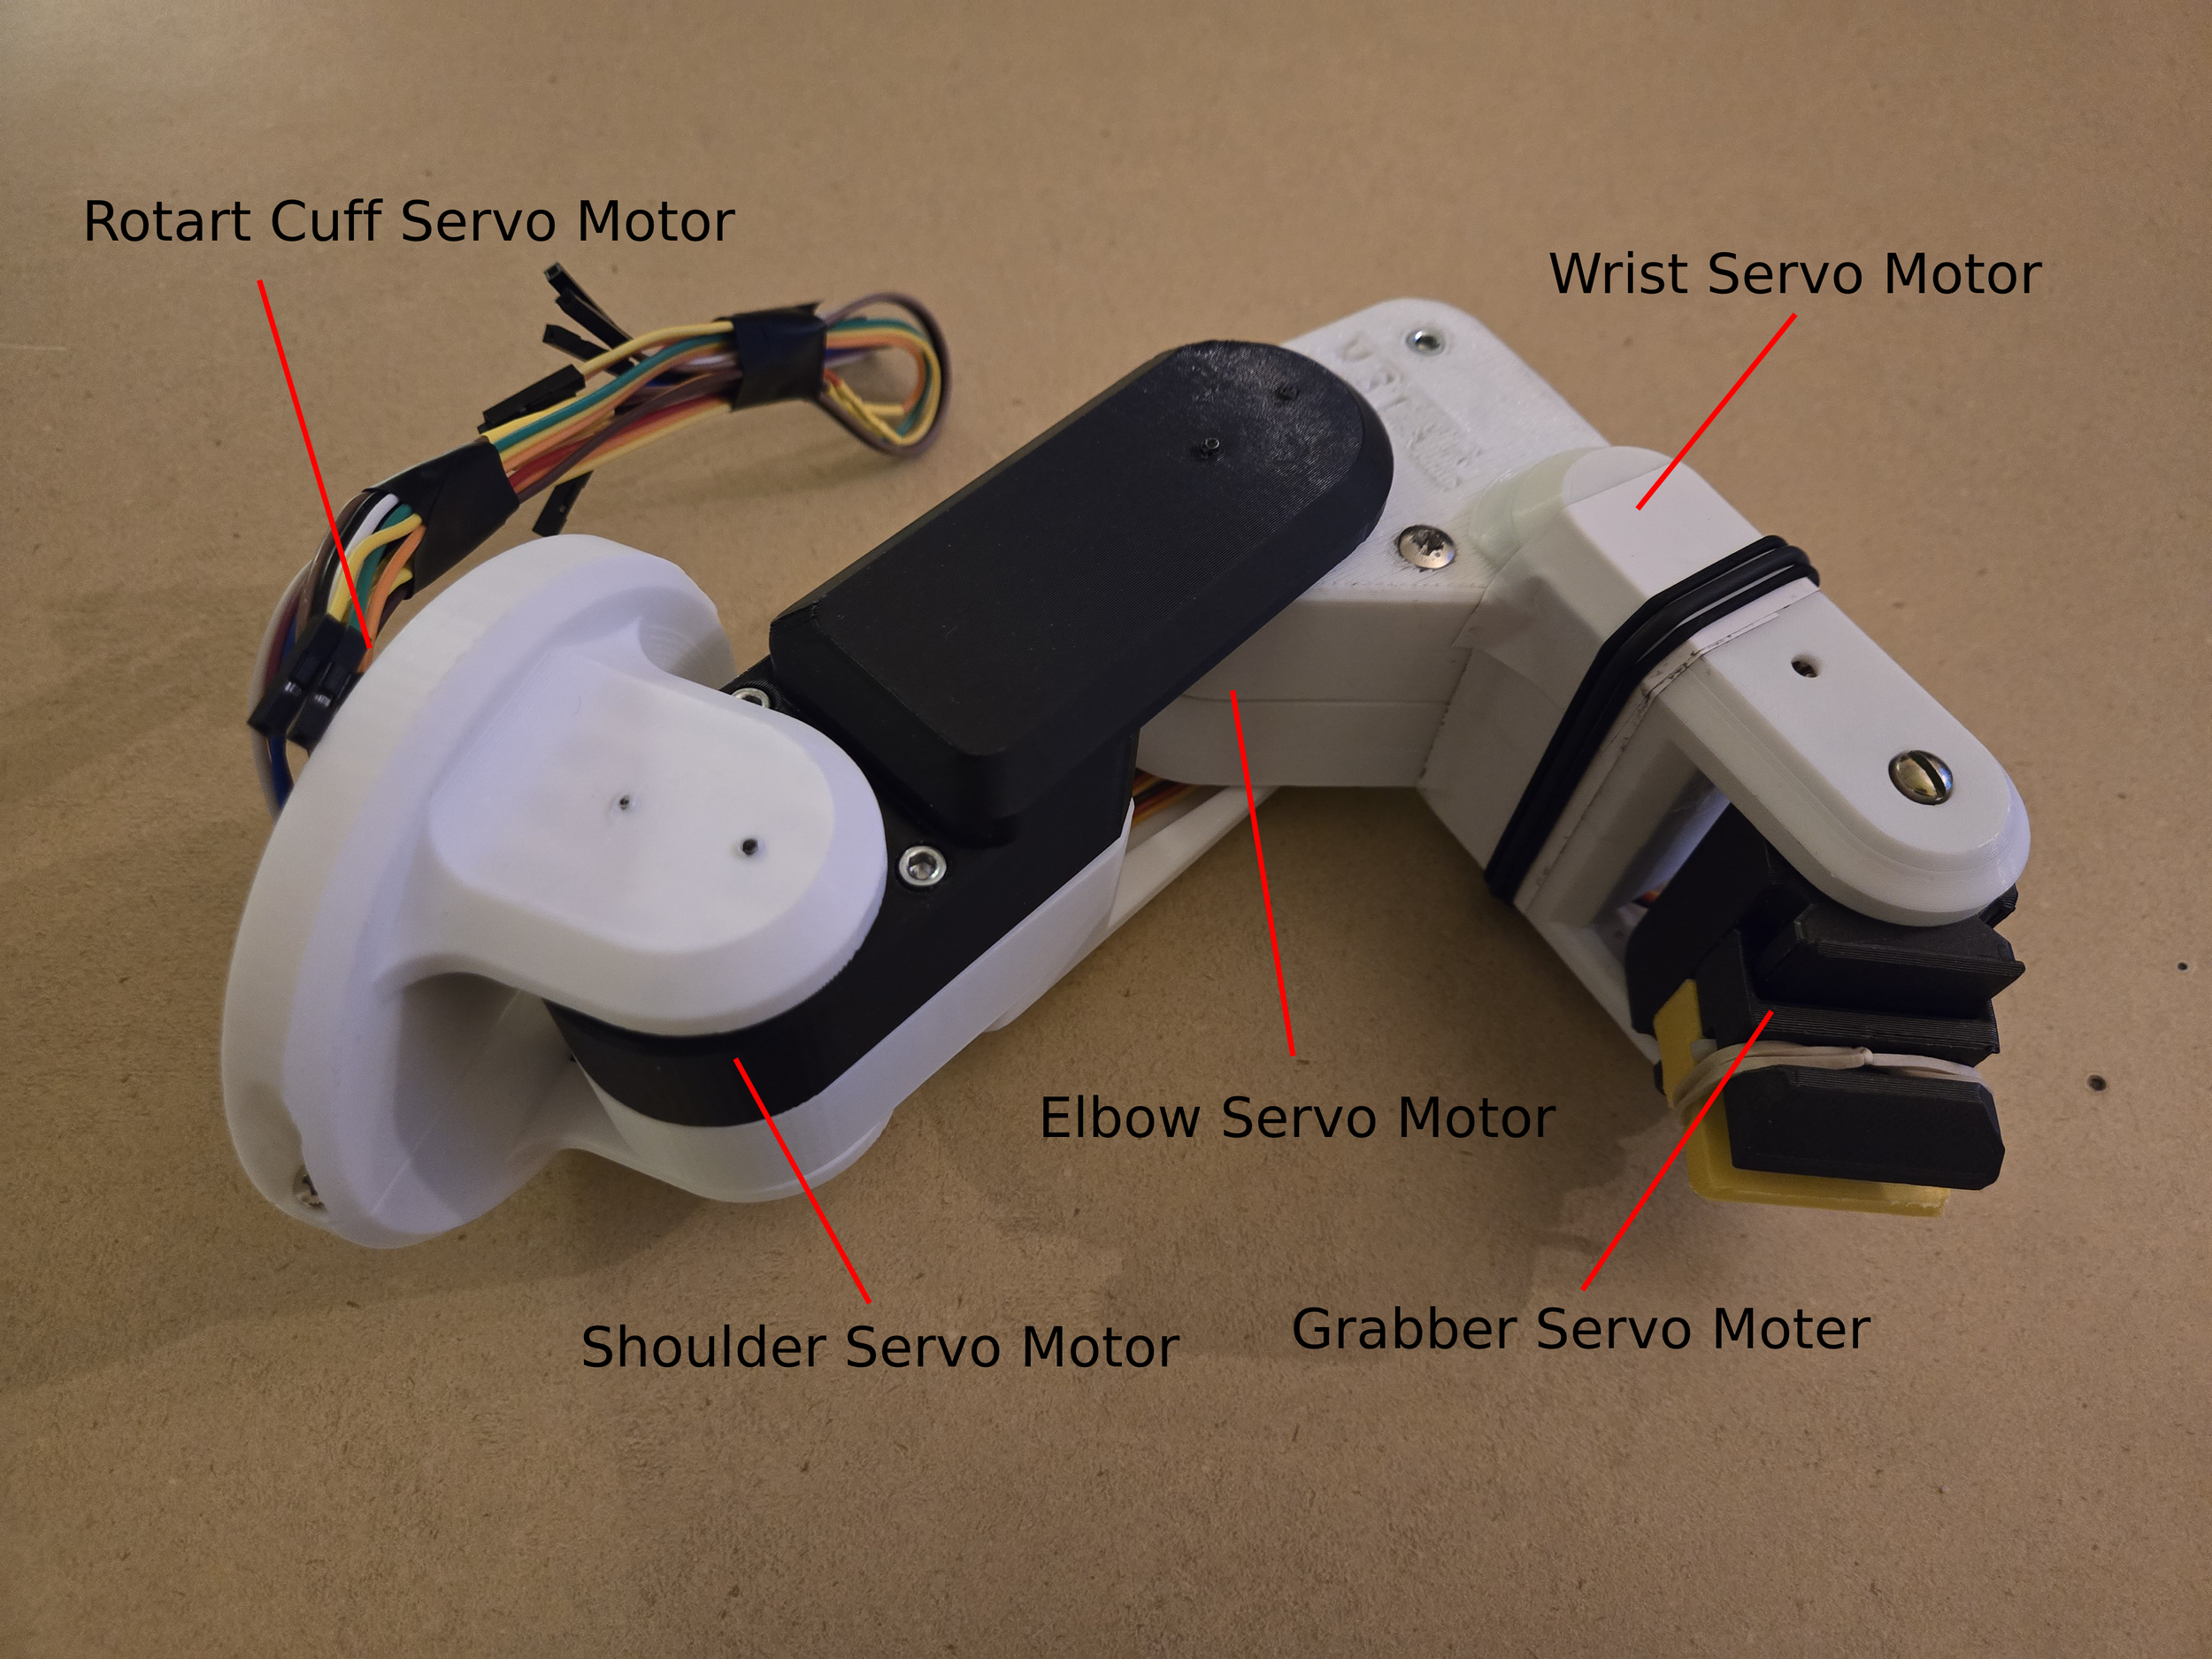
In the film, Wall-E uses his arms and grippers to grasp objects, which the team emulates with a four-degree-of-freedom robot arm. The right arm, based on a design by 'Build Some Stuff' on YouTube, was modified for better wire routing, stronger attachments, an improved gear train, and more reliable servo connections. The 3D-printed arm uses five servo motors controlling the rotary cuff, shoulder, elbow, wrist, and grabber.
The arm is connected to an Adafruit servo board and integrated with the team's PCB, all controlled by a Raspberry Pi 4. The code operates based on defined states, allowing the arm to toggle between positions for grabbing, depositing items inside the chassis, and waving. Special care was taken to map out keep-out zones to prevent hardware collisions.
The most complex part of the arm is the wrist and grabber sub-assembly. A gear train ensures effective wrist movement, while the grabber uses a servo to push 3D-printed arms apart. Rubber bands allow the grabber to maintain grip without constant servo force.
The completed arm can pick up a Nerf Rival ball, place it inside Wall-E’s compartment, point, and wave to enhance the robot's emoting capabilities.
Electrical System
To control Wall-E’s mechanical hardware, the Reamobile Team developed a printed circuit board (PCB) to organize wires, speed up connections using JST connectors, and safely link electrical components to prevent shorts. Designed in Fusion 360 and manufactured by JCLPCB, a schematic of the PCB is provided in the slide deck to the right
The compartment not only stores potential objects but also houses the robot's electronics, powered by an 11.1V LiPo battery. The PCB features a buck-type voltage converter that steps down the battery voltage to 5V for the Raspberry Pi, servos, and other components.
On run-off day, Wall-E successfully achieved several of the goals and tasks the team had set. It demonstrated its ability to interact with its environment, pick up and store objects, and display a range of dynamic expressions through its visual system. Despite some challenges during testing and integration, Wall-E’s overall performance met key project objectives, showcasing the combined efforts of design, coding, and hardware integration.
This project not only allowed me to apply my skills in mechanical design, circuit integration, and programming, but it also reinforced the importance of troubleshooting and adapting quickly to unexpected obstacles. I'm proud of the progress made and the lessons learned, and I look forward to applying these insights to future robotics projects.
Team Reamobile: Ian O'Neill, Kimberly Fung, Trent Bjorkman, Tyler L’Hotta, Michael Becerra (Me)


